

Dosa has already become one of the most sought-after South Indian dishes. The food is not only relished in South India but all over India and internationally. Dosa has also emerged as the ideal choice for breakfast, brunch, or sometimes even dinner. A large number of people tend to purchase ready-made dosa and dosa batter due to their hectic schedule. However, preparing dosa and dosa batter at home is easier and healthier.
Many people find dosa easy-to-digest as it is a low-fat source of energy. The process of fermentation breaks down starches that makes it gentle on the stomach and boosts good bacteria or probiotics. The presence of lentils in batter offers plant-based protein that will help in muscle repair. Today, we will highlight traditional dosa batter recipe and the step-by-step dosa preparation method.
The secret behind a ideal dosa lies in its batter. Adequately-fermented batter helps in making the dosa crisp, golden, and flavourful. Effective proportion, grinding, and fermentation are crucial steps that determine quality of the dosa. Homemade batter lets you adjust the texture—whether you like crisp paper dosa or soft, thicker dosas.
1 cup rice (dosa rice or regular rice)
¼ cup urad dal
2 tablespoons poha (flattened rice) – optional but recommended
½ teaspoon methi seeds
Salt (to taste)
Water as required
You need to start by washing the rice, urad dal, and methi seeds adequately. It eliminated any dust and -enhances the fermentation later. Now soak the rice–dal mixture for approximately 4-6 hours. Soak poha separately for nearly 20 minutes prior to grinding. Poha helps the dosa turn softer and offers a nice golden colour.
2. Grind
Drain the soaked water and transfer everything to a mixer grinder. Add poha and a little fresh water. Grind the mixture until it turns into a smooth, slightly thick batter. The batter should be easy to pour but not watery. Grinding in batches helps get a better texture.
3. Fermentation
Pour the batter into a large bowl—fermentation will increase its volume. Add salt and mix well. Cover and keep it in a warm place for 8–12 hours or overnight. The batter is perfectly fermented when it rises, becomes airy, and shows tiny bubbles on top.
4. Adjusting Consistency
After fermentation, mix the batter lightly. Add some water if it looks too thick. For dosa, the batter should be thinner than idli batter but not runny.
Your dosa batter is now ready to use.
Heat a cast iron or non-stick tawa on medium flame. Sprinkle a few drops of water; if it sizzles, the tawa is ready. Wipe it gently with an oiled cloth.
Pour one ladleful of batter in the center and quickly spread it outwards in a circular motion. The thinner the spread, the crispier the dosa.
Add a few drops of oil or ghee around the edges. Let it cook until it turns golden and crisp. You usually don’t need to flip the dosa unless you like it browned on both sides.
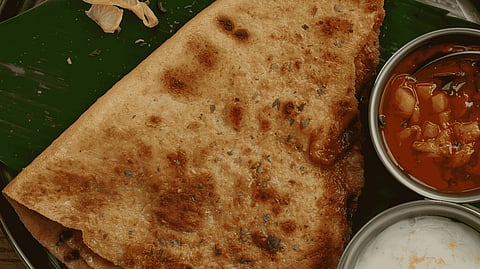
Fold the dosa and serve hot with coconut chutney, tomato chutney, and sambar. You can also add masala potato to make masala dosa.
It is worth mentioning that dosa batter is best used within 2–3 days of preparation provided it is refrigerated. Once you master the basic batter, you can experiment with rava dosa, set dosa, or even instant varieties. With this guide, making delicious, crispy dosas at home becomes easy and enjoyable!
At marvelof.com, we spotlight the latest trends and products to keep you informed and inspired. Our coverage is editorial, not an endorsement to purchase. If you choose to shop through links in this article, whether on Amazon, Flipkart, or Myntra, marvelof.com may earn a small commission at no extra cost to you.


